NetflixのVectorを試してみる
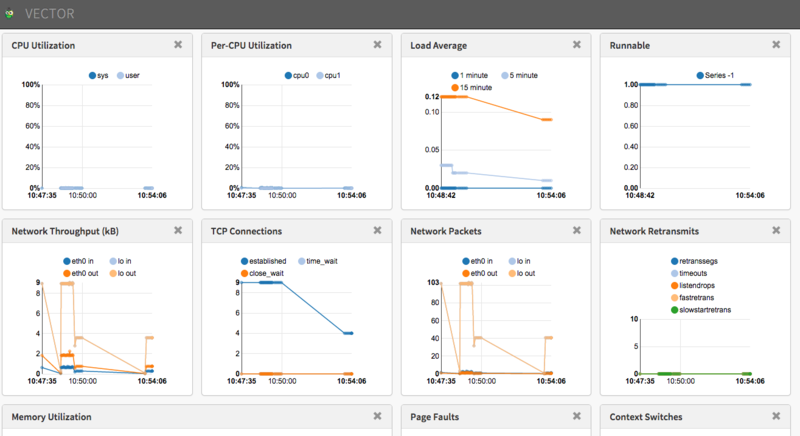
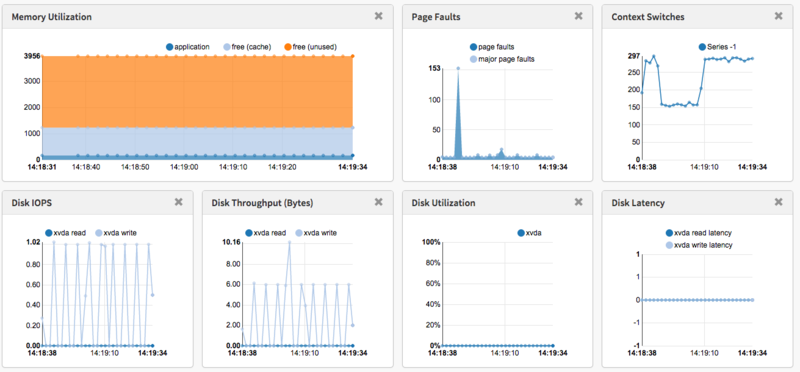
Introducing Vector: Netflix's On-Host Performance Monitoring Tool と記事を見かけたので、どんなものか試してみた。
試した環境は、Amazon Linux 2015.03 です
監視対象ホストの準備
メトリックスの収集にPerformance Co-Pilot (PCP)を利用するので、これをインストールします。
コンパイル用のライブラリを一括で入れる
sudo yum -y groupinstall "Development Tools"z
libmicrohttpdを利用するので入れる
sudo yum -y install libmicrohttpd libmicrohttpd-devel
ExtUtils::MakeMakerを利用するので入れる
sudo yum -y install perl-ExtUtils-MakeMaker
pcpをソースからインストール
# 事前にユーザーを作成
sudo groupadd -r pcp
sudo useradd -c "Performance Co-Pilot" -g pcp -d /var/lib/pcp -M -r -s /usr/sbin/nologin pcp

git clone git://git.pcp.io/pcp
cd pcp/
./configure --prefix=/usr --sysconfdir=/etc --localstatedir=/var --with-webapi
make
sudo make install
何故かエラーになる
 sudo service pmcd start

Rebuilding PMNS ... pmnsmerge: error while loading shared libraries: libpcp.so.3: cannot open shared object file: No such file or directory
Rebuilding the Performance Metrics Name Space (PMNS) in /var/lib/pcp/pmns ...
Rebuild: PCP upgrade processing for "root" PMNS changes ...
Rebuild: merging the following PMNS files:
root root_jbd2 root_linux root_mmv root_pmcd root_proc root_root root_xfs
Rebuild: pmnsmerge failed
         "root" has not been changed.
failed (status=1)
Starting pmcd ... /usr/libexec/pcp/bin/pmcd: error while loading shared libraries: libpcp_pmda.so.3: cannot open shared object file: No such file or directory
pmcd_wait: error while loading shared libraries: libpcp.so.3: cannot open shared object file: No such file or directory
/usr/libexec/pcp/bin/pmpost: error while loading shared libraries: libpcp.so.3: cannot open shared object file: No such file or directory
/etc/init.d/pmcd: pmcd_wait failed: exit status: 127

/usr/libexec/pcp/bin/pmpost: error while loading shared libraries: libpcp.so.3: cannot open shared object file: No such file or directory
http-parser が必要っぽいので入れる
sudo yum -y install http-parser
サービスを起動
sudo service pmcd start
sudo service pmwebd start
vectorのインストール
vectorのインストールにはbowerを使うのだが、bowerにインストールにはnpmが必要となるので、インストールしていきます。
sudo yum -y install npm --enablerepo=epel
sudo npm install -g bower
sudo npm install -g gulp
vector本体をインストール&起動
git clone https://github.com/Netflix/vector.git
cd vector/
git checkout stable
bower install
cd app
sudo python -m SimpleHTTPServer 80
勝手な思い込みで、複数ホストのメトリックスをいい感じにダッシュボードに表示してくれるものなのかと思ってたら、ちょっと違った。
AWS 認定ソリューションアーキテクト – アソシエイト
先日、AWS 認定ソリューションアーキテクト – アソシエイトの認定試験を受けてきてきました。
結果は無事合格。
総合スコア: 83%
内訳
1.0 高可用性、コスト効率、耐障害性、スケーラブルなシステムの設計: 84%
2.0 実装/デプロイ: 80%
3.0 セキュリティ: 75%
4.0 トラブルシューティング: 100%
日頃運用でつかているからか、トラブルシューティングは100%とれたけど、自分でもわかっているがIAM周りの知識の無さが、セキュリティーの点数に出てしまったかなって気がする。
勉強方法
受験料が16,200円と、軽い気持ちで受けて落ちたとなったら結構ヘコむので、念のため事前に情報収集しました。
実際に試験を受けた人のブログをいくつか見て回った所、だいたい以下の様なことがされてました。
- ワークショップの受講(有料)
- 模擬試験を受ける(有料)
- サンプル問題を解く
- 各サービスの製品の詳細&よくある質問を読む
- マイスターシリーズのスライドを見る
- クラウドデザインパターンを読む
- 書籍を読む(有料)
自分の場合は、いかに安くをモットーに、有料の物は見送りました。
ということで、やれることは、以下のものになります
・サンプル問題は、どんな感じの問題なのか雰囲気がつかめるし無料なのでぜひやっておくといいです。
http://aws.amazon.com/jp/certification/certified-solutions-architect-associate/
・普段利用していても、サービスの細かい機能まで使っていないことが多いから、「製品の概要&よくある質問」はひと通り目を通しました。
https://aws.amazon.com/jp/documentation/
・マイスターシリーズとクラウドデザインパターンは、普段から見たりしているので特別なことはしませんでした。
http://aws.clouddesignpattern.org/index.php/%E3%83%A1%E3%82%A4%E3%83%B3%E3%83%9A%E3%83%BC%E3%82%B8
http://www.slideshare.net/AmazonWebServicesJapan
プロフェッショナル
次のレベルはプロフェッショナルですが、サンプル問題を見るとAWSのサービスに関する知識よりも、もっと実践的な知識を必要とされているのがわかります。
http://aws.amazon.com/jp/certification/certified-solutions-architect-professional/
なかなか厳しいですね・・。
プロフェッショナルはまだいつ受けるか決めてませんが、さすがに模擬試験ぐらいは受けてみようと思いました。
自腹で受けて、落ちたら32,400円って金額はなかなかなものだしね。
JAWSDAYS2015に参加してきた
JAWSDAYSは今回で3度目の参加で、ボランティアスタッフとしては2度目となります。

初回は2013年の時で、セッションの案内とか受付をしてました。その当時だと、同時セッション数も4つぐらいでしたが、今回は倍に増えさらに、AWSかるた、AWS麻雀といった、様々なイベントが開催されていました。
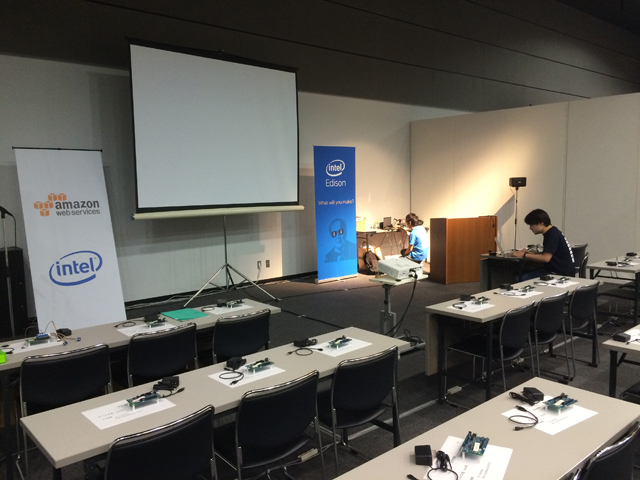
今回お手伝いしたのは、Intel Edisonを使ったハンズオン。
自分自身も興味を持って触っているEdisonのセッションということで、正直スタッフをキャンセルして普通に参加したいぐらいの盛り沢山なセッションでした。

事前準備としてhackday担当のスタッフと一緒に50台のEdisonのファームアップデートをやったり、当日はサポートで一日中張り付いていたので、他のセッションを見ることもなく、お弁当にもありつけず、なかなか忙しい感じでしたが、jawsdaysは楽しめました。
(来場者に配っていたAWSのアイコンのマグネットをもらい損ねたのが心残りではありますがw)
今回はPubCrawlも開催され、私はグループ2の会場に参加しました。
グループ2は以下の3社がスポンサーとなり、飲食しつつLTを楽しむ形となってました。
・トレンドマイクロ株式会社
・レキサス
・アールスリーインスティテュート
それにしても、EdisonとAWS(クラウド)の相性は良いですね。
認証にCognitoを使い、データの受取にはkinesis。
データの分析にEC2を使い、データのストレージとしてS3を使う。
普通のWebサービスを公開するよりも多くのAWSサービスを駆使することを考えると、ものすごく面白い。
個人ではEdison breakout boardを使ってますが、手軽に楽しむなら確実に今回のhackdayで使ったIntel Edison Board for Aduino + Grove Starter Kit Plus がお勧めですね。
Edisonのファームアップデート
購入後にファームアップデートをしてからだいぶ経ったので、最新はどんなもんかとファームアップデートしてみました。
ちなみに現在のバージョン
root@edison:~# cat /etc/version
edison-weekly_build_68_2014_09_13-49-07
まずは、Supports & DownloadsからYocto complete image をダウンロードします。
EdisonとUSB(J3とJ16)でMacに接続します。
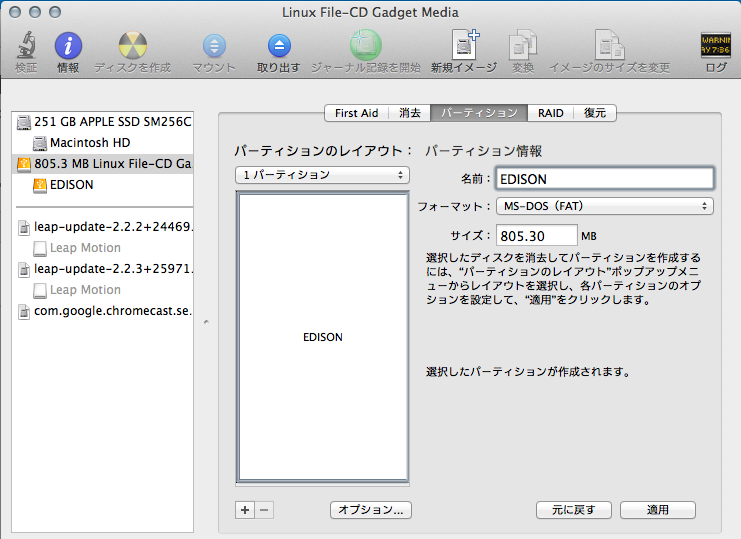
Macにマウントされるので、古いファイルをターミナルからコマンドを叩いて削除します。
rm -rf /Volumes/EDISON/*
rm -rf /Volumes/EDISON/\.*
ダウンロードして解凍したファイルをコピー
cp -r /Users/hoge/Downloads/edison-image-ww05-15/* /Volumes/EDISON/
Edisonにシリアルポート経由でつなぐ
screen /dev/cu.usbserial-A903C2MH 115200 -L
Edisonの再起動
reboot ota
これで、先ほどコピーしたファイルでファームのアップデートがされます。
再起動が終わってみてバージョンを確認してみると
root@edison:~# cat /etc/version
weekly-120
root@edison:~# uname -a
Linux edison 3.10.17-poky-edison+ #1 SMP PREEMPT Fri Jan 30 14:16:35 CET 2015 i686 GNU/Linux
バージョン表記がずいぶんさっぱりと・・。
初期化してしまったので、パスワードやらWi-Fiの設定が消えてしまっているので、設定をします。
前回は、configure_edisonと実行すると、Q&A形式で設定できたけど、その辺の仕様は変わったらしい。
引数で何を設定するか指定しないとダメなようだ。
root@edison:~# configure_edison
usage: configure_edison [-h] [--server]
                        [[--setup | --name | --password | --wifi]
                        [--showWiFiIP | --version | --latest-version | --upgrade | --disableOneTimeSetup | --enableOneTimeSetup | --flash <version> [<release name> ...]
                        | --flashFile <image-file> | --showNames]

optional arguments:
  -h, --help            show this help message and exit
  --server              Starts the server (testing only)
  --setup               Goes through changing the device name, password, and
                        wifi options
  --name                Changes the device name
  --password            Changes the device password
  --wifi                Changes the wifi options
  --showWiFiIP          IP address associated with the wireless interface
  --version             Gets the current firmware version
  --latest-version      Gets the latest firmware version
  --upgrade             Downloads the latest firmware
  --disableOneTimeSetup
                        Disable one-time setup and WiFi access point
  --enableOneTimeSetup  Enable one-time setup and WiFi access point
  --flash <version> [<release name> ...]
                        Downloads and flashes an image
  --flashFile <image-file>
                        Flashes the given image (.zip).
  --showNames           Show device name and SSID
--setupオプションを指定すると、ウィザード形式で登録出来ました。
root@edison:~# configure_edison --setup

Configure Edison: Device Password

Enter a new password (leave empty to abort)
This will be used to connect to the access point and login to the device.
Password:       *********
Please enter the password again:        *********
The device password has been changed.

First-time root password setup complete. Enabling SSH on WiFi interface.

Configure Edison: Device Name

Give this Edison a unique name.
This will be used for the access point SSID and mDNS address.
Make it at least five characters long (leave empty to skip): hoge_edison
Is hoge_edison correct? [Y or N]: y

Do you want to set up wifi? [Y or N]: y

Configure Edison: WiFi Connection

Scanning: 1 seconds left

0 :     Rescan for networks
1 :     Exit WiFi Setup
2 :     Manually input a hidden SSID
3 :     hoge
4 :     fuga
5 :     hogehoge
6 :     fugafuga
7 :     hogefuga
8 :     fugahoge


Enter 0 to rescan for networks.
Enter 1 to exit.
Enter 2 to input a hidden network SSID.
Enter a number between 3 to 9 to choose one of the listed network SSIDs:
Is hogehoge correct? [Y or N]: Y
Password must be between 8 and 63 characters.
What is the network password?:
Initiating connection to hogehoge. Please wait...
Attempting to enable network access, please check 'wpa_cli status' after a minute to confirm.
Done. Please connect your laptop or PC to the same network as this device and go to http://192.168.0.2 or http://hoge_edison.local in your browser.
これで無事ネットに繋がる
root@hoge_edison:~# curl -I http://yahoo.co.jp

HTTP/1.1 301 Moved Permanently
Server: nginx
Date: Sat, 07 Mar 2015 09:01:13 GMT
Content-Type: text/html
Connection: close
P3P: policyref="http://privacy.yahoo.co.jp/w3c/p3p_jp.xml", CP="CAO DSP COR CUR ADM DEV TAI PSA PSD IVAi IVDi CONi TELo OTPi OUR DELi SAMi OTRi UNRi PUBi IND PHY ONL UNI PUR FIN COM NAV INT DEM CNT STA POL HEA PRE GOV"
Location: http://www.yahoo.co.jp/
Cache-Control: private
Vary: Accept-Encoding
X-Frame-Options: SAMEORIGIN
gitなども消えてしまったので、インストールしていきます。
こちらのサイトでお勧めなパッケージリストが公開されているのでそれをありがたく使います
http://nonnoise.github.io/Edison/
curl http://nonnoise.github.io/Edison/_sources/Edison/base-feeds.conf -o /etc/opkg/base-feeds.conf
curl http://nonnoise.github.io/Edison/_sources/Edison/intel-iotdk.conf -o /etc/opkg/intel-iotdk.conf
curl http://nonnoise.github.io/Edison/_sources/Edison/mraa-upm.conf -o /etc/opkg/mraa-upm.conf

opkg update
opkg upgrade
gitを入れる
opkg install git

root@hoge_edison:~# git --version
git version 1.9.0
vimを入れる(結構時間かかった)
git clone https://github.com/b4winckler/vim.git
cd vim
./configure --with-features=huge
make
make install
bashを入れる
opkg install bash

root@hoge_edison:~# cat /etc/shells
# /etc/shells: valid login shells
/bin/sh
/bin/bash
bashをデフォルトにする
chsh -s /bin/bash
よく使うエイリアスを指定
vim .bashrc

alias ls='ls --color=auto'
alias ll='ls -la --color=auto'
alias rm='rm -i'
alias vi='vim'
ログインした時にbashrcが読み込まれるように
vim .bash_profile

if [ -f ~/.bashrc ]; then
. ~/.bashrc
fi
npm install aws-sdk
これで、だいたい元に戻った。
CloudWatch Logsでログを気軽にチェックする
CloudWatch Logs使ってますか?
filter + カスタムメトリックスで簡単な監視を設定できるし、色々と便利ですよね。
アプリでエラーが発生した時も、カスタムメトリックスのアラートを使えば、通知もしてくれるので簡単な監視のシステムはこれでなんとかなる感じです。
しかし、アラートを検知してもそのログを一緒に通知してくれれば便利なんですが(Amazonさんお願いします!!)、原因を調べるためにSSHでサーバに入ってログを確認する必要があります。
けど、その都度サーバにログインして調べるのも、開発者にアカウントを発行してと言った設定も出てくるし、間違えて変なコマンドを実行されたら大変な事になります。
そこで、もっと気軽にログを見れる方法がないか考えてみたところ、CloudWatch Logsに送り込んでるログを見れるようにすれば、わざわざサーバにSSHしなくてもできるんじゃないかと思いました。
そんな訳で、スクリプトを書いた。
https://github.com/sparkgene/cloudwatch_logs_tail
使い方
オプション
% ruby tail_cwlog.rb --help

Usage: tail_cwlog [options]
        --use-iamrole                USE IAM ROLE
        --aws-region=[VALUE]         AWS REGION
        --aws-access-key=[VALUE]     AWS ACCESS KEY
        --aws-secret-key=[VALUE]     AWS SECRET KEY
        --discribe-groups            Describe log groups
        --discribe-streams           Describe log streams
        --tailf                      tail -f log stream
        --tail=[VALUE]               tail log stream
        --log-group=[VALUE]          log group name
        --log-stream=[VALUE]         log stream name
CloudWatch Logsに登録されているLog Groupの一覧表示
% ruby tail_cwlog.rb --aws-region=ap-northeast-1 --discribe-groups

/var/log/cron
/var/log/maillog
/var/log/messages
/var/log/secure
Log Groupに含まれているLog Streamの一覧取得
% ruby tail_cwlog.rb --aws-region=ap-northeast-1 --discribe-streams --log-group=/var/log/cron

server-apps-1
server-apps-2
server-apps-3
tail -100 みたいに過去のログを表示したい場合
% ruby tail_cwlog.rb --aws-region=ap-northeast-1 --log-group=/var/log/cron --log-stream=server-apps-3 --tail=100

Feb 21 01:22:01 server-apps-3 CROND[2837]: (root) CMD (/var/awslogs/bin/awslogs-nanny.sh > /dev/null 2>&1)
Feb 21 01:23:01 server-apps-3 CROND[2863]: (root) CMD (/var/awslogs/bin/awslogs-nanny.sh > /dev/null 2>&1)
Feb 21 01:24:01 server-apps-3 CROND[2890]: (root) CMD (/var/awslogs/bin/awslogs-nanny.sh > /dev/null 2>&1)
tail -fみたいにログを監視したい場合
% ruby tail_cwlog.rb --aws-region=ap-northeast-1 --log-group=/var/log/cron --log-stream=server-apps-3 --tailf

Feb 21 01:22:01 server-apps-3 CROND[2837]: (root) CMD (/var/awslogs/bin/awslogs-nanny.sh > /dev/null 2>&1)
Feb 21 01:23:01 server-apps-3 CROND[2863]: (root) CMD (/var/awslogs/bin/awslogs-nanny.sh > /dev/null 2>&1)
Feb 21 01:24:01 server-apps-3 CROND[2890]: (root) CMD (/var/awslogs/bin/awslogs-nanny.sh > /dev/null 2>&1)
-
- tailf オプションでは、デフォルトで最後の20行を表示して、ログの監視を行います。
5秒に1回ログを見に行きますので、サーバからCloudWatch Logsにアップロードされ、手元に届くまでタイムラグがあります。
よりリアルタイムで監視したい場合は、
sleep(5)
となっている部分、調整して使ってください。
注意
CloudWatch Logsに格納されているデータをダウンロードする場合は、AWSの転送料及びAPI利用料がかかります。
http://aws.amazon.com/cloudwatch/pricing/
Amazon CloudWatch API Requests
$0.01 per 1,000 GetMetricStatistics, ListMetrics, or PutMetricData requestsAmazon CloudWatch Logs*
$0.50 per GB ingested**
$0.03 per GB archived per month***
Data Transfer OUT from CloudWatch Logs is priced equivalent to the “Data Transfer OUT from Amazon EC2 To” and “Data Transfer OUT from Amazon EC2 to Internet” tables on the EC2 Pricing Page(http://aws.amazon.com/ec2/pricing/).
ご利用は計画的に。
td-agentのインストールでハマった件
*.posファイルが存在するとtd-agentが起動できない現象に遭遇
サーバは
Amazon Linux 2014.09 (hvm)
td-agentのバージョン
[root@server1 td-agent]# td-agent --version
td-agent 0.10.55

[root@server1 td-agent]# rpm -qi td-agent
Name        : td-agent
Version     : 1.1.21
Release     : 0
Architecture: x86_64
Install Date: 2015年02月05日 11時51分41秒
Group       : System Environment/Daemons
Size        : 103551538
License     : APL2
Signature   : DSA/SHA1, 2014年10月20日 13時07分39秒, Key ID 1093db45a12e206f
Source RPM  : td-agent-1.1.21-0.src.rpm
Build Date  : 2014年10月20日 08時31分13秒
Build Host  : ip-10-123-31-198.ec2.internal
Relocations : (not relocatable)
Vendor      : Treasure Data, Inc.
URL         : http://treasure-data.com/
Summary     : td-agent
Description :
confファイルの設定は
  <source>
    type config_expander
    <config>
      type tail
      format syslog
      path /var/log/messages
      pos_file /var/log/td-agent/syslog.messages.pos
      tag syslog.messages
    </config>
  </source>

  <match *.**>
    type forest
    subtype s3
    <template>
      s3_bucket hoge
      s3_region fuga
      s3_object_key_format %{path}%{time_slice}.%{file_extension}
      path ${tag}/
      buffer_path /var/log/td-agent/buffer/${tag}
      time_slice_format %Y/%m/%d/%H/%H%M.${hostname}
      flush_interval 1m
    </template>
  </match>
  <source>
    type forward
    port 24224
  </source>
td-agentが落ちてしまう時のログ
2015-02-05 12:19:11 +0000 [info]: fluent/engine.rb:107:block in configure: adding source type="config_expander"
2015-02-05 12:19:11 +0000 [trace]: fluent/plugin.rb:72:register_impl: registered input plugin 'config_expander'
2015-02-05 12:19:11 +0000 [info]: fluent/engine.rb:107:block in configure: adding source type="config_expander"
2015-02-05 12:19:11 +0000 [info]: fluent/engine.rb:107:block in configure: adding source type="config_expander"
2015-02-05 12:19:11 +0000 [info]: fluent/engine.rb:107:block in configure: adding source type="config_expander"
2015-02-05 12:19:11 +0000 [info]: fluent/engine.rb:107:block in configure: adding source type="config_expander"
2015-02-05 12:19:11 +0000 [info]: fluent/engine.rb:107:block in configure: adding source type="config_expander"
2015-02-05 12:19:11 +0000 [info]: fluent/engine.rb:107:block in configure: adding source type="config_expander"
2015-02-05 12:19:11 +0000 [info]: fluent/engine.rb:107:block in configure: adding source type="config_expander"
2015-02-05 12:19:11 +0000 [info]: fluent/engine.rb:107:block in configure: adding source type="config_expander"
2015-02-05 12:19:11 +0000 [info]: fluent/engine.rb:107:block in configure: adding source type="forward"
2015-02-05 12:19:11 +0000 [info]: fluent/engine.rb:124:block in configure: adding match pattern="*.**" type="forest"
2015-02-05 12:19:11 +0000 [trace]: fluent/plugin.rb:72:register_impl: registered output plugin 'forest'
2015-02-05 12:19:11 +0000 [info]: plugin/in_tail.rb:475:initialize: following tail of /var/log/messages
2015-02-05 12:19:11 +0000 [trace]: fluent/plugin.rb:72:register_impl: registered output plugin 's3'
2015-02-05 12:19:11 +0000 [info]: fluent/engine.rb:237:ensure in run: shutting down fluentd
2015-02-05 12:19:11 +0000 [info]: fluent/supervisor.rb:240:supervise: process finished code=256
2015-02-05 12:19:11 +0000 [warn]: fluent/supervisor.rb:243:supervise: process died within 1 second. exit.
gem達
[root@server1 td-agent]# ll /usr/lib64/fluent/ruby/lib/ruby/gems/1.9.1/gems/
合計 244
drwxr-xr-x 3 root root 4096  2月  5 11:51 aws-sdk-1.52.0
drwxr-xr-x 5 root root 4096  2月  5 12:09 aws-sdk-v1-1.61.0
drwxr-xr-x 4 root root 4096  2月  5 11:51 bson-1.11.1
drwxr-xr-x 3 root root 4096  2月  5 11:51 bson_ext-1.8.6
drwxr-xr-x 6 root root 4096  2月  5 11:51 bundler-1.3.6
drwxr-xr-x 6 root root 4096  2月  5 11:52 cool.io-1.3.0
drwxr-xr-x 7 root root 4096  2月  5 11:51 diff-lcs-1.2.5
drwxr-xr-x 5 root root 4096  2月  5 11:51 fluent-logger-0.4.9
drwxr-xr-x 4 root root 4096  2月  5 11:51 fluent-mixin-config-placeholders-0.3.0
drwxr-xr-x 4 root root 4096  2月  5 11:51 fluent-mixin-plaintextformatter-0.2.6
drwxr-xr-x 4 root root 4096  2月  5 11:52 fluent-plugin-config-expander-0.1.5
drwxr-xr-x 5 root root 4096  2月  5 11:51 fluent-plugin-flume-0.1.1
drwxr-xr-x 4 root root 4096  2月  5 11:52 fluent-plugin-forest-0.3.0
drwxr-xr-x 5 root root 4096  2月  5 11:51 fluent-plugin-mongo-0.7.3
drwxr-xr-x 4 root root 4096  2月  5 11:51 fluent-plugin-rewrite-tag-filter-1.4.1
drwxr-xr-x 4 root root 4096  2月  5 12:09 fluent-plugin-s3-0.5.2
drwxr-xr-x 5 root root 4096  2月  5 11:51 fluent-plugin-scribe-0.10.12
drwxr-xr-x 4 root root 4096  2月  5 11:51 fluent-plugin-td-0.10.22
drwxr-xr-x 4 root root 4096  2月  5 11:51 fluent-plugin-td-monitoring-0.1.3
drwxr-xr-x 4 root root 4096  2月  5 11:51 fluent-plugin-webhdfs-0.3.1
drwxr-xr-x 7 root root 4096  2月  5 11:51 fluentd-0.10.55
drwxr-xr-x 3 root root 4096  2月  5 11:51 git-1.2.8
drwxr-xr-x 4 root root 4096  2月  5 11:51 hirb-0.7.2
drwxr-xr-x 7 root root 4096  2月  5 11:51 http_parser.rb-0.5.1
drwxr-xr-x 6 root root 4096  2月  5 11:51 httpclient-2.4.0
drwxr-xr-x 4 root root 4096  2月  5 11:51 iobuffer-1.1.2
drwxr-xr-x 4 root root 4096  2月  5 11:51 ipaddress-0.8.0
drwxr-xr-x 6 root root 4096  2月  5 11:51 jeweler-1.6.2
drwxr-xr-x 9 root root 4096  2月  5 11:51 json-1.7.7
drwxr-xr-x 4 root root 4096  2月  5 11:51 ltsv-0.1.0
drwxr-xr-x 4 root root 4096  2月  5 11:51 mini_portile-0.6.0
drwxr-xr-x 4 root root 4096  2月  5 11:51 mixlib-cli-1.5.0
drwxr-xr-x 4 root root 4096  2月  5 11:51 mixlib-config-2.1.0
drwxr-xr-x 4 root root 4096  2月  5 11:51 mixlib-log-1.6.0
drwxr-xr-x 3 root root 4096  2月  5 11:51 mixlib-shellout-1.6.0
drwxr-xr-x 5 root root 4096  2月  5 11:51 mongo-1.8.6
drwxr-xr-x 6 root root 4096  2月  5 11:52 msgpack-0.5.11
drwxr-xr-x 7 root root 4096  2月  5 11:51 nokogiri-1.5.10
drwxr-xr-x 6 root root 4096  2月  5 11:51 ohai-6.20.0
drwxr-xr-x 4 root root 4096  2月  5 11:51 parallel-0.6.5
drwxr-xr-x 3 root root 4096  2月  5 11:51 rake-0.9.2.2
drwxr-xr-x 3 root root 4096  2月  5 11:51 rdoc-3.9.5
drwxr-xr-x 3 root root 4096  2月  5 11:51 rspec-3.0.0
drwxr-xr-x 4 root root 4096  2月  5 11:51 rspec-core-3.0.4
drwxr-xr-x 3 root root 4096  2月  5 11:51 rspec-expectations-3.0.4
drwxr-xr-x 3 root root 4096  2月  5 11:51 rspec-mocks-3.0.4
drwxr-xr-x 3 root root 4096  2月  5 11:51 rspec-support-3.0.4
drwxr-xr-x 4 root root 4096  2月  5 11:51 rubyzip-0.9.9
drwxr-xr-x 3 root root 4096  2月  5 11:51 sigdump-0.2.2
drwxr-xr-x 5 root root 4096  2月  5 11:51 string-scrub-0.0.3
drwxr-xr-x 5 root root 4096  2月  5 11:51 systemu-2.5.2
drwxr-xr-x 9 root root 4096  2月  5 11:51 td-0.11.5
drwxr-xr-x 5 root root 4096  2月  5 11:51 td-client-0.8.66
drwxr-xr-x 5 root root 4096  2月  5 11:51 td-logger-0.3.23
drwxr-xr-x 6 root root 4096  2月  5 11:52 thread_safe-0.3.4
drwxr-xr-x 7 root root 4096  2月  5 11:51 thrift-0.8.0
drwxr-xr-x 4 root root 4096  2月  5 11:52 tzinfo-1.2.2
drwxr-xr-x 3 root root 4096  2月  5 11:52 tzinfo-data-1.2015.1
drwxr-xr-x 6 root root 4096  2月  5 11:51 uuidtools-2.1.5
drwxr-xr-x 4 root root 4096  2月  5 11:51 webhdfs-0.5.5
drwxr-xr-x 8 root root 4096  2月  5 11:51 yajl-ruby-1.1.0
ツイッターで@repeatedlyに相談した所、td-agent2を入れてみたところこの現象が出なくなった!
ざっくりな質問に真摯に対応してくださったrepeatedly に感謝です!!
今回は
wget http://packages.treasuredata.com.s3.amazonaws.com/2/redhat/7/x86_64/td-agent-2.1.3-1.x86_64.rpm
rpm -ivh td-agent-2.1.3-1.x86_64.rpm
/opt/td-agent/embedded/bin/fluent-gem install fluent-plugin-config-expander
/opt/td-agent/embedded/bin/fluent-gem install fluent-plugin-forest
service td-agent start
で無事解決
Intel EdisonでAdafruit Ultimate GPSを使う
以前にRaspberry Pi用に購入したAdafruit Ultimate GPSがあったので、Edisonで使えないか試してみました。
GPSのモジュールは小さく1円玉ぐらいのサイズです。

外付けのアンテナも取付可能ですが、これ単体でも小さいアンテナが付いているので、GPSの信号を受診することが可能らしい。
(Raspberry Pi用に買ったけど、一度も使ったことがない)
Edisonとの接続ですが、せっかくUSB OTGに対応しているので、GPSモジュールとUSBでつなげようとしたけど、うまく出来ずに断念しました。
次に、EdisonはUART(Universal Asynchronous Receiver Transmitter)の入出力のbreakout boardピンにも配置されているので、そっちに接続して試してみることに。
GPSのモジュールは3.3v〜5vの電源で駆動するので、手っ取り早くUSBから5vを取ってGPSモジュールに印加します。
GPSモジュールのRXをEdisonのJ19 - pin 8 GP131 UART1_TXにつなぎ、TXをJ18 - pin 13 GP130 UART1_RXにつなぎます
GPSモジュールに電源をつなぐと、赤いLEDが点滅し始めます。
GPSの信号を受信できている状態で/dev/ttyMFD1をcatしてみるとズラズラとデータが出力されてくるのが確認できます。
次にnodejsでこのデータを読み取れるように、受信したデータをログ出力するだけのスクリプトを書きます。
(Adafruitが公開しているGPSのライブラリはC++で書かれているのですが、Cで書くのも辛いのでnodejsであればserial通信用のライブラリもあるし、JavaScriptで進めたいと思いました。)
var SerialPort = require("serialport").SerialPort;
var port = "/dev/ttyMFD1";
var serialPort = new SerialPort(port, {
  baudrate: 9600
}, false);

console.log("Open port: "+ port);
serialPort.open(function (error) {
  if (error) {
    console.log('Failed to open: '+error);
  } else {
    console.log('open');
    serialPort.on('data', function(data) {
      console.log('data received: ' + data);
    });
  }
});
このスクリプトを実行すると、、
root@sparkgene-edison:~/node_gps# node reader.js
Open port: /dev/ttyMFD1
open
data received: $GPGGA,030937.000,3500.2796,N,13900.6471,E,1,07,1.29,43.9,M,39.3,M,,*57
$GPGSA,A,3,15,13,29,05,193,02,30,,,,,,1.54,1.29,0.85*37
$GPRMC,030937.000,A,3500.2796,N,13900.6471,E,0.28,322.35,240115,,,A*63
$GPVTG,322.35,T,,M,0.28,N,0.51,K,A*36

data received: $GPGGA,030938.000,3500.2797,N,13900.6471,E,1,07,1.29,43.9,M,39.3,M,,*59
$GPGSA,A,3,15,13,29,05,193,02,30,,,,,,1.54,1.29,0.85*37
$GPRMC,030938.000,A,3500.2797,N,13900.6471,E,0.18,221.91,240115,,,A*62
$GPVTG,221.91,T,,M,0.18,N,0.33,K,A*3D

data received: $GPGGA,030939.000,3500.2797,N,13900.6470,E,1,07,1.29,43.9,M,39.3,M,,*59
$GPGSA,A,3,15,13,29,05,193,02,30,,,,,,1.54,1.29,0.85*37
$GPRMC,030939.000,A,3500.2797,N,13900.6470,E,0.43,243.74,240115,,,A*63
$GPVTG,243.74,T,,M,0.43,N,0.79,K,A*32
お〜、なんか受信できてるけどさっぱりわからんww
で、Adafruitのライブラリを読んでると、GPGGAとかの文字からパース処理をしているのがわかったので、ググってみるとGPSのモジュールからはNMEAというフォーマットでデータが出力されるとのことでした。
なるほど。
ということはJavaScriptで受信したデータをフォーマットに合わせてパースすれば人にやさしいデータに変換できるということ。
そんなわけで、まだ一部分のやっつけ的なソースですが、パースする処理を書いてみました。
https://github.com/sparkgene/node_gps/blob/master/gps_reader.js
このソースを使って、もう一度受信しているデータをパースしてみると、、
root@sparkgene-edison:~/node_gps# node gps_reader.js
Open port: /dev/ttyMFD1
open
Time(UTC): 6:38:57.0
Status: A
Latitude: N 35.001221666666665
Longitude: E 139.00406666666667
Time(UTC): 6:38:58.0
Status: A
Latitude: N 35.00122
Longitude: E 139.00406833333334
Time(UTC): 6:38:59.0
Status: A
Latitude: N 35.00122
Longitude: E 139.00406833333334
Time(UTC): 6:39:0.0
Status: A
Latitude: N 35.00122
Longitude: E 139.00406833333334
Time(UTC): 6:39:1.0
Status: A
Latitude: N 35.00122
Longitude: E 139.00406666666667
Time(UTC): 6:39:2.0
緯度経度が見やすくなりました。
上記のデータは一部書き換えているのであれですが、実際にキャプチャーできたデータをgoogle mapで見てみると、10m以内ぐらいの誤差でばっちりと現在地を表示しました。
室内で試したので、屋外に出たり、アンテナを繋いだらもっと精度は高くなるかも。


